
Finding the perfect scope for your rifle is crucial if you want to get satisfactory results in all your attempts. But to shoot with precision and efficiency, you’ll need to familiarize yourself with how the different scope models work.
Dive into this comprehensive guide on how to adjust a rifle scope for maximum productivity at the shooting range.
After reading this, take a look at our article on the best rifle scopes out there.
Contents
Basic Riflescope Features
Hundreds of rifle sighting devices are available on the market nowadays from different manufacturers. Although these prospects may vary in functioning, their builds include some common elements so you can make effective adjustments.
Your standard scope should have lenses, adjustment knobs, and the main tube to guarantee optimal functioning. Here’s a deeper analysis of the essential parts of a scope that you can see externally:
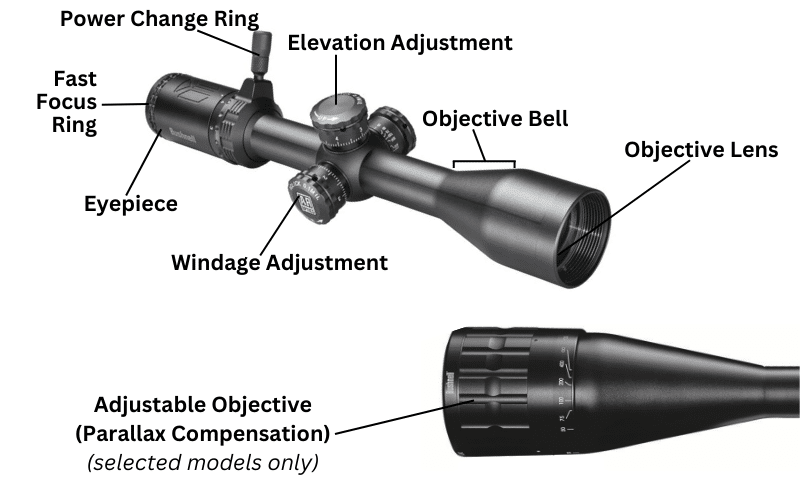
Objective Lens
Most rifle optics place the objective lens on the bigger side of the sight’s body and are housed in the objective bell. It’s among the most critical components of a scope.
The primary function of an adjustable objective lens is to provide a clear view of the target and its surroundings by gathering light from the natural environment. Know that the lens’ size mainly affects brightness, meaning the lighting gets better as you increase the size of the objective lens.
On the other hand, a lower power and smaller objective lens will guarantee exceptional performance at close-range targets. Bigger and higher-power objective lenses best serve long-range shooters.
The best way to know the size of your rifle scope’s objective lens is by checking the model. If it is a 3-9×40, then the lens is 40mm. Also, note that the ocular lens is smaller than the objective lens. (Reference 1: How To Adjust a Scope)
Objective Bell
The objective bell in most rifle optics is a reamed section connected with the main tube. Its primary role is maintaining the objective lens while reducing impact and exterior damage.
In addition, the objective bell and lens work perfectly to provide precise target images by seamlessly gathering adequate light.
Ocular Lens
You’ll find the ocular lens on the smaller side of your scope, opposite the adjustable objective lens. Since it’s inside the eyepiece, it’s the closest to your eye when using your scope.
The ocular lens works to gather light and view from the objective lens. You’ll be able to see distant targets from the eyepiece, but your eye shouldn’t be so close as to touch it. Most scopes will have a good amount of eye relief.
Most rifle scopes also feature a coated lens. The coating on the lens surface helps reduce reflection and light loss, effectively reducing eye fatigue when aiming for long-range targets. There are in fact different levels of coating to make the ocular lens waterproof, weatherproof, and increase light transmission.
Eyepiece
Another fundamental part of a scope is the eyepiece. The eyepiece is metallic and houses the ocular lens on one side of the sighting system. Several riflescope models feature an adjustment section to tweak the reticle’s focus to achieve the best target view.
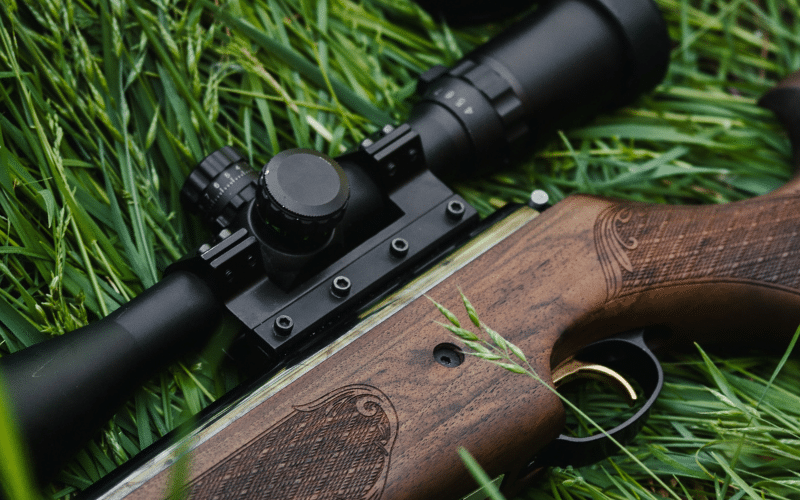
Main Tube
The rifle scope’s body is also called the main tube or the scope tube and is made out of aluminum 6061 or 6063, then anodized. The scope’s body has two main sizes – 1 inch and 30mm.
So, the main tube bridges the objective and ocular lens in a scope. The base part is machined to accommodate other parts like the adjustment turrets and erector lenses. Consider the 34mm bodies if you’re looking for maximum light transmission on your scope.
Power Ring – Magnification Adjustment
The two magnification types in rifle scopes are fixed and variable magnification. Scopes with variable magnification include power scope rings to adjust the scope’s magnification levels.
The engraved numbers on its exterior design indicate the levels, and turning the scope rings shortens or lengthens the distance between the two lenses.
It’s an integral part of your variable magnification rifle optic since it allows you to zoom in and out of your target for a better view. Note that fixed magnification scopes don’t have a power ring because you can’t adjust their magnification level.
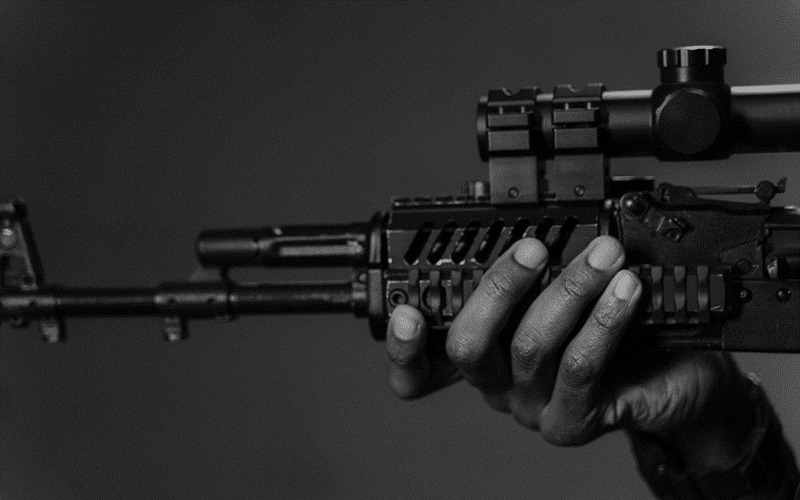
Elevation Turret

The elevation turret is a metal knob for precision adjustment, also known as the elevation adjustments knob. Turning the knob allows you to adjust the reticle up and down.
Windage Turret
Another metal knob for precision adjustment is the windage adjustment turret. It’s vital in a scope’s functioning since it lets you adjust reticle alignment horizontally.
You’ll find it on the right side of your scope; after every 100 yards, you’ll hear a click. Some optics will require small coins or a screwdriver to adjust.
Reticle
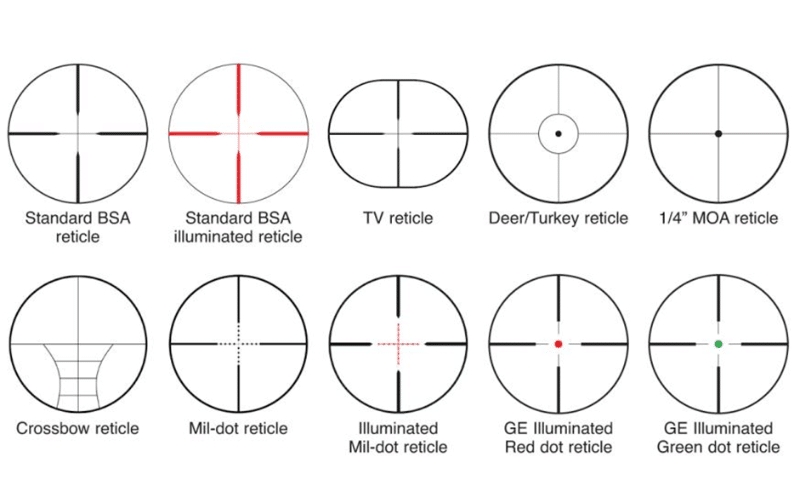
A rifle scope’s reticle provides you with crosshairs to guide your aiming. There are different types of reticles, each perfect for specific applications. The most common reticle designs include duplex, mil-dot, and BDC reticles.
Mounting Your Rifle Scope
After purchasing your scope, the first thing to do is mount it on your rifle. There are three critical areas to consider when installing your optic. They include:
- Your scope’s height
- Your scope’s forward/ rear position
- Your scope’s level
The best approach to take when mounting the scope is to handle everything yourself. But you can also consider taking your firearm to a professional gunsmith to avoid all the hassles involved.
Follow this guide to perfectly mount your scope:
Adjusting the Scope Height (For the Eye Box)
Experienced shooters can agree that it’s never easy to position your scope at the perfect height for your eye. The objective is to set the scope where the ocular lens and the front of your eye align.
You should also be able to rest your cheek comfortably and get a clear field of view. Your shooting will less likely be precise if you need to adjust your position to see into the scope in every attempt.
Now, there are several approaches to take when adjusting your scope’s height. One practical solution is buying replacement scope mounts to achieve the perfect height for the eye box. If the sighting device is too high, you can also buy a cheek rest to get your rifle stock higher.
The most important thing is to get your eye in the perfect position at every shooting attempt. Note that scopes with a forgiving eye box offer a quicker and more straightforward approach to positioning your eye comfortably.
Adjusting the Scope Forward and Backward (For Eye Relief)

Adjusting your scope up and down positions your eye in the eye box while moving the scope forward and backward delivers eye relief. All magnified scopes have a specific eye relief, and you’ll only see your target image clearly at that distance.
One of the most frustrating things when learning how to shoot is eye relief. Keeping your eye in the same position while holding still is challenging. The image becomes useless if you’re not close enough or get too close.
Adjusting the scope forward and backward is easy when you have enough room on the main tube. You’ll only need to loosen the rings and move the scope forward or back. However, don’t excessively tighten the rings on both ends of the scope as they can easily break.
Sometimes, you may find that you’ve maxed out how far you can scoot the particular scope, but it’s still not far enough. In that case, you’ll have to loosen the rings at the rail and move them further. A cantilever mount is necessary for the rings to fall as back as possible.
You must know your scope’s eye relief to achieve easier weapon handling and fast target acquisition. Also, select a scope compatible with your rifle to avoid troubles down the line.
Leveling the Scope
You are more likely to encounter a truckload of issues if the installed scope isn’t perfectly leveled. You’ll find that anytime you make elevation or windage adjustments, they’ll move at an angle. Luckily, it’s easy to identify a scope not leveled when shooting longer distances.
You can place a bubble level or a leveler kit between the flat spot under the rail and turret adjustments to get it right. The rifle must be perfectly aligned when leveling your rifle scope.

How to Adjust Focus on a Rifle Scope (Focusing the Eyepiece)
Adjusting your scope to the perfect shooting position is the first step to mastering accuracy and precision. The next task is focusing the eyepiece, which every shooter should do when handling a scope.
The focus on the eyepiece determines the reticle’s sharpness or blurriness. You can adjust it by turning the eyepiece (the housing around the ocular lens).
The best approach to focusing the eyepiece is turning the eyepiece all the way down until the reticle becomes blurry. Then slowly crank it the other way as you observe the image’s clarity. Repeat this process until you achieve a sharp and clear picture.
How to Adjust a Rifle Scope (Sighting-In)

Learning how to sight a rifle scope is an essential skill every shooter needs to master. Sighting is a crucial step in getting accurate shots from your rifle.
Why is that? Well:
- It allows you to make accurate shots even from longer distances.
- You feel more confident about hitting targets consistently.
- It provides you with an edge in shooting competitions.
The following are the steps to take when sighting in your rifle scope:
- Start by mounting your scope and confirm it’s correctly installed.
- The next step is getting the reticles on target. Start with dry fires before loading your rifle if it’s your first time shooting.
- You’ll need to zero the scope to achieve more accurate results.
- Depending on the rifle scope, use ballistics to zero the device beyond 100 yards (91.4 meter.
How to Align Rifle Scope with Bore
Bore sighting is a practical approach to sight in your rifle. Taking the time to bore sight your scope helps you avoid many problems in the future while ensuring accuracy in all your shots.
Here’s how to align a optic using a bore:
- Securely mount and torque down the scope onto the rifle according to the recommended specifications.
- Remove the bolt from the rifle to get a clear view of the bore.
- Ensure the rifle is on a gun vise or a stable rest to prevent any random movements.
- Peep through the bore, and adjust the rifle’s position until you get a clear view of the target.

- Adjust the scope’s position until the crosshairs are centered on the target without moving the rifle.
- Tighten the screws on the scope mount to lock it in place
- Replace the bolt and confirm accuracy by taking several test shots
Following the manufacturer’s installation instructions for your specific model would be best. If you’re unsure of anything during the process, you can always seek professional assistance.
Elevation Adjustment (Adjusting a Rifle Scope Up and Down)

You can adjust the elevation on your rifle scope by tweaking the elevation adjustment knobs on the main tube’s design. This process involves compensating for bullet drop by adjusting your rifle scope reticle up and down.
To adjust the elevation of your reticle, follow these steps:
- Calculate the distance to your target and your ammunition’s bullet drop. You can find this information from the manufacturer or a ballistics chart on the shooting range.
- If you know the bullet drop, adjust the turret to the corresponding mark on the scope. If not, try test firing until the bullet hits the target.
- Verify the elevation adjustment by firing a group of shots.
- If the shots are either high or low, repeat the adjustment process until you get satisfactory results.

Before making elevation adjustments, zero the rifle to provide an accurate starting point. You must also understand the scope’s units of measurement for seamless operation.
The perfect configuration should have each elevation turret click corresponding to a specific adjustment in MOA or MILRAD.
Windage Adjustment (Adjusting a Rifle Scope Left or Right)
Adjusting for windage (left and right) is essentially the same process as adjusting for elevation. You can find the windage knob on the right of the scope and turning it forward moves the reticle right while turning it back moves it left.
You can follow steps 3 and 4 above to compensate for wind, but frankly, most shooters don’t do this because the wind is often inconsistent. What most people do is count on feeling and they develop a certain sense over time to adjust their shot according to the state of the wind.
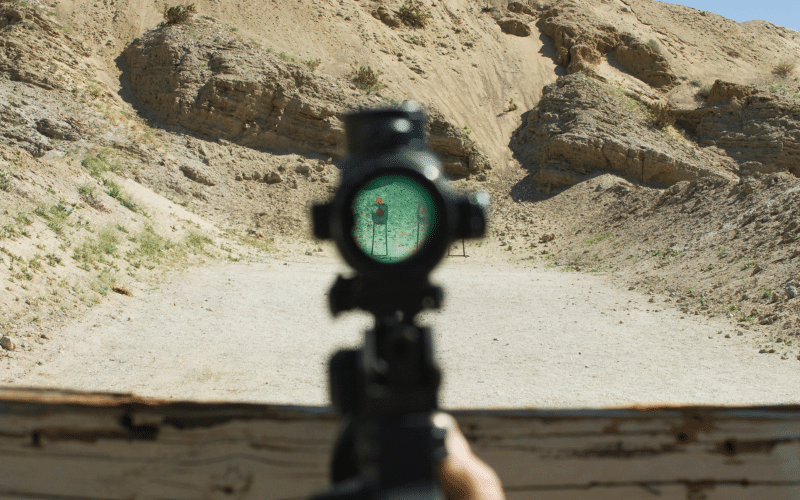
Parallax Adjustment (Target Focus)
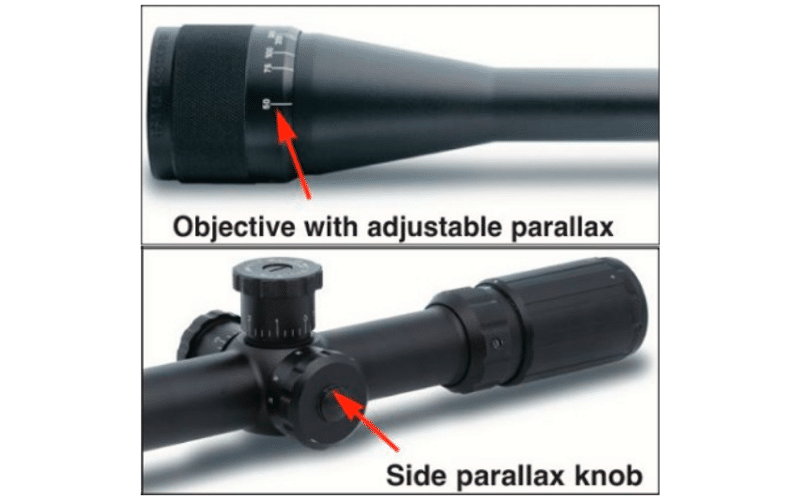
Target focus is a common feature in most scope models and binoculars. The adjustable parallax feature allows the user to adjust the reticle’s focal point or crosshairs to the same distance as the target.
Essentially, parallax is when the focus is misaligned with the target’s focal point, making the reticle look like it’s moving relative to the target as the shooter’s eye position changes.
Adjusting parallax is not complicated; you only need to turn a knob on the optic to shift the reticle position. To ensure the point of aim remains consistent, the reticle should be in the same focal plane as the target.
Here’s how to adjust parallax in a scope:
- Set the appropriate magnification level to view the target.
- While looking through the scope, slightly move your head from side to side and observe if the reticle moves with the target. You’ll need to adjust the parallax if it does.
- Locate the parallax adjustment knob and adjust it until the target and reticle are on the same focal plane.
- You can manually adjust for parallax if your scope lacks an adjustment knob. Adjust your head slightly forward or backward until the reticle and target are on a common focal plane.
- The final step is checking your zero to ensure the adjustment didn’t affect it.
Understand that the steps to adjusting parallax may vary with scope type and model. The best solution is consulting with the user’s manual provided with your purchase.
Changing the Brightness of Illuminated Reticles

Modern scope designs come with an illuminated reticle option. This reticle helps you operate your scope in adverse lighting conditions like snowy or cloudy environments.
The illuminated reticle also allows the shooter to adjust the brightness depending on the surrounding light conditions. Here’s how to change the brightness:
- Locate the brightness adjustment knob on the side or top of your optic.
- Adjust the reticle’s brightness by turning the knob; clockwise increases while anticlockwise decreases reticle brightness.
- Set the brightness to fit the lighting conditions. Increase the brightness in low light conditions and decrease it when aiming under direct sunlight.
- After making the adjustments, check your zero to confirm everything is okay.
Magnification Adjustments

There are two ways you can make magnification adjustments to your scope. Which approach to use depends on whether the scope is FFP or SFP.
So, FFP rifle scopes have a reticle that grows and shrinks with magnification. On the other hand, the reticle in an SFP remains the same regardless of the magnification level.
First Focal Plane Scopes
The crosshairs in an FFP rifle scope change size as you increase or decrease the magnification level. It means you have accurate reticle measurements at the different magnification levels available.
Adjusting the first focal plane scope requires turning the magnification ring on the main tube. Tweaking the adjustment knob will adjust magnification and reticle size simultaneously.
Second Focal Plane Scopes
The reticle in SFP scopes remains the same regardless of the magnification level. It means you only have accurate reticle measurements at a specific magnification range. In most models, it’s the highest magnification level.
You’ll need to determine the correct magnification level to guarantee accurate reticle measurements when making magnification adjustments in an SFP scope.
Time to Shoot
After you’ve tightened the scope and focused the reticle, you get to the fun part – shooting your rifle. Use the ammo you plan to hunt with to guarantee a successful training session when practicing. It helps give you a good idea of weapon handling in the field.
To make your first-time rifle shooting easy, use sandbags or shooting rests to steady the rifle when looking through your scope.
Position the crosshairs at the target’s center and fire your rifle. The gun should recoil, and the shot should land. Repeat the process several times until you’re satisfied.
How to Set a Rifle Scope Back to Zero or Factory Settings?
Returning a scope to the factory settings is not challenging. However, it would help to refer to the user manual when making any adjustments.
Here are the basic steps to set your scope back to zero:
- Unmount the scope and place it on a stable surface.
- Identify the windage turret and elevation turret and loosen the screws securing the turrets to allow adjustments.
- Use a coin or tool to adjust the turrets back to zero.
- Secure the turrets by tightening the screws after setting the scope to zero.
- Remount the scope on your rifle and sight it in.
How to Zero a Red Dot?

If you use a red dot sight on your rifle, you’ll need to know how to zero it. Red dot zeroing involves aligning the firearm’s point of impact with the sight’s point of impact.
You can follow the steps below to zero your red dot sight:
- Select the shooting distance to zero the red dot and set up a paper target.
- Securely mount the sight on your rifle.
- Using the windage and elevation knobs, move the point of impact (POI) to the point of aim (POA) on the target.
- Test your configuration by firing several rounds and checking the target’s bullet holes.
- Fine-tune the sight until you align the POI with the POA.
For more reading see: Scope Adjustment Which Way to Turn: Left or Right?
Frequently Asked Questions

Why adjust a rifle scope?
You need to adjust your rifle scope regularly to ensure you align the POA and POI in every shooting attempt. Aligning these two points is crucial in achieving accuracy.
Adjusting a rifle also offers consistency. It means you get to hit the target repeatedly and in almost all your attempts. Another reason is it allows you to adapt to different shooting conditions.
How many clicks on a scope is an inch?
The number of clicks equal to an inch depends on the scope’s model and reticle configuration. Generally, the scope’s adjustment settings and the reticle’s sub-tension determine the number of clicks required to move the POI by an inch.
Most rifle scopes are adjustable in 1/8 MOA or 1/4 MOA. In 1/4 MOA scopes, one click equals ¼ inch at 100 yards (91.4 meters) and an eighth at 100 yards for 1/8 MOA.
What are the 3 adjustments on a scope?
The three main adjustments on most rifle scopes include windage, elevation, and magnification adjustments.
Windage turrets allow you to move the crosshairs right or left to compensate for horizontal bullet deviation, while elevation compensates for vertical variations. Changing your scope’s magnification helps you target distant objects.
How to adjust rifle scope diopter?
To adjust a rifle scope diopter, you must first locate the diopter adjustment knob on the scope’s eyepiece. Rotate the knob as you look through the scope until the crosshairs are sharp and clear. Ensure you lock the diopter adjustment in place after achieving the best focus.
How to set a rifle scope at 25 yards?
To set a rifle scope at 25 yards (22.8 meters), start by placing a target 25 yards from the rifle. Adjust for windage and elevation by taking several consistent shots at the target until the point of impact is satisfactory.
Is a first focal plane better than a second focal plane scope?
Whether a first focal plane is better than a second focal plane scope or not boils down to shooting requirements and personal preference.
Generally, FFP scopes are perfect for long-range shooters or quick range estimation and holdover correction. Second focal plane scopes are exceptional for hunting and shooting at shorter ranges since the reticle remains the same size even on high magnification levels.
References
- Bushnell Riflescope Instruction Manual. Retrieved From: https://www.bushnell.com/on/demandware.static/-/Library-Sites-HuntShootAccessoriesSharedLibrary/default/dwa31be2a6/productPdfFiles/bushnellPdf/Product%20Manuals/Riflescopes/PDF/AROpticsScopes_all2018models_5LIM_FullManual_web.pdf
I have been writing firearms and outdoor material for over 50 years to date. I have hunted across the world, including Russia, and a great deal of time professional hunting in Australia. I currently live in the American West and hunt all across the Black Hills of South Dakota and the Big Horn Mountains. I have specialized much of my work as a load developer in shotguns and rifles. I have run a small company that builds suppressor barrels of my design and load tests for writing purposes and consulting. My commercial names include Ballistics Research & Development / Metro Gun Systems TM.
Or contact me at:
- Email me at LP@riflegearlab.com
- Follow me on Facebook
- See my website
- Buy my book: Gun Digest Guide to Modern Shotgunning
- Buy my book: The Gun Digest Book of Long-Range Shooting


